
Install on Shopify
Add your botts.ai chat widget to a Shopify store by pasting one line into your theme's theme.liquid file, in seven steps.
This guide adds the chat widget of a botts.ai website deployment to a Shopify store. It uses Shopify's code editor: you paste the widget's script into your theme's theme.liquid file, just before the closing </body> tag. The code then loads on every page of your store. It belongs to that one theme, so if you later publish another theme, you add it there again.
Before you start
You need:
- Access to your Shopify admin. Staff accounts need the Themes and Edit code permissions from the Online store section.
- A Shopify plan with the full online store: Basic, Grow, Advanced or Plus. On the Starter plan, Shopify offers only the Spotlight theme, without other customization options.
- A theme whose code you can edit. Free themes from the Shopify Theme Store are fine. A paid theme you're only trying out can't be edited until you buy it.
- The embed code of your website deployment. In botts.ai, open Agents, pick your agent, go to the Deploy tab and open the Website deployment. The Install section at the bottom of the editor shows the code with a copy button. No website deployment yet? See Deployments.
The embed code looks like this, with your deployment's own key in place of YOUR_API_KEY:
<script async src="https://api.botts.ai/widget/chat-widget.js?key=YOUR_API_KEY"></script>
Note
The website widget needs the Business plan or higher. The Personal plan includes the internal chat only.
Step 1: Open your themes
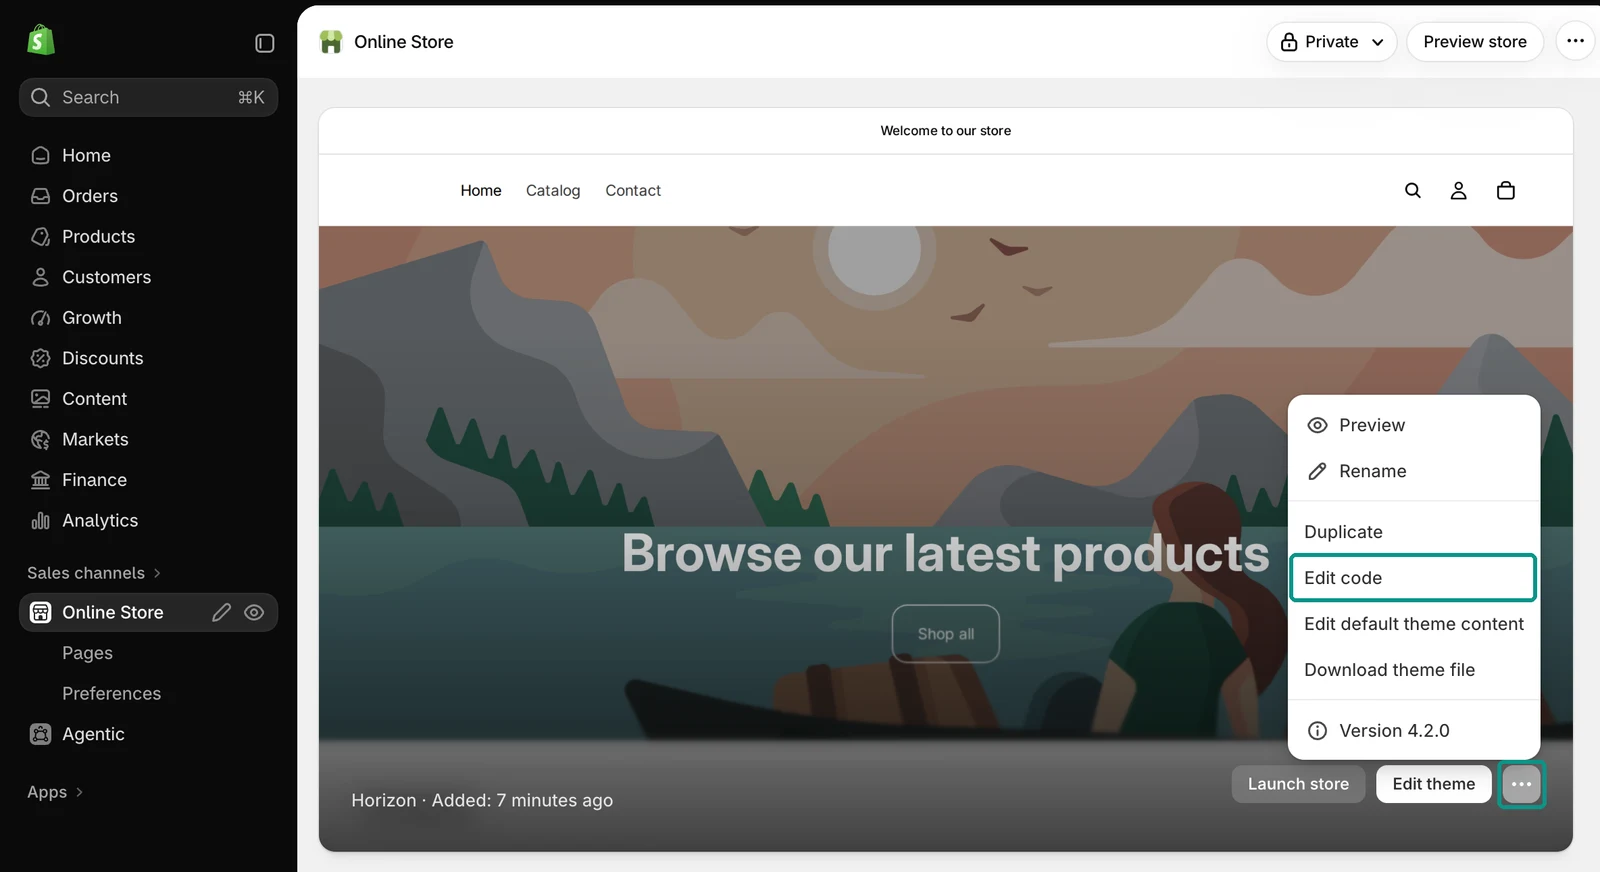
Sign in to your Shopify admin. In the left sidebar, under Sales channels, click Online Store. Your published theme, the one your store currently uses, is shown at the top of the page as a large preview. Its ⋯ button sits in the bottom-right corner of that preview, next to Edit theme.
Step 2: Make a backup copy
Shopify recommends duplicating your theme before you edit its code. Next to your published theme, click the ⋯ button and then Duplicate. The copy appears on the same page and stays unpublished. If anything goes wrong, you can go back to it.
Step 3: Open the code editor
Click the ⋯ button next to your published theme again and choose Edit code. Make sure it's the published theme, not the copy. The code editor opens in a new browser tab.
Step 4: Open theme.liquid
In the file list on the left, open the layout folder and click theme.liquid. You can also press ⌘ + P (Mac) or Ctrl + P (Windows) and type theme.liquid.
Step 5: Paste the code before the closing body tag
Scroll to the end of the file, or press ⌘ + F (Mac) or Ctrl + F (Windows) and search for </body>. Click at the start of that line, press Enter to make an empty line above it, and paste your embed code there. Paste the code exactly as copied: the address and the key must not change. Leave everything else in the file as it is.
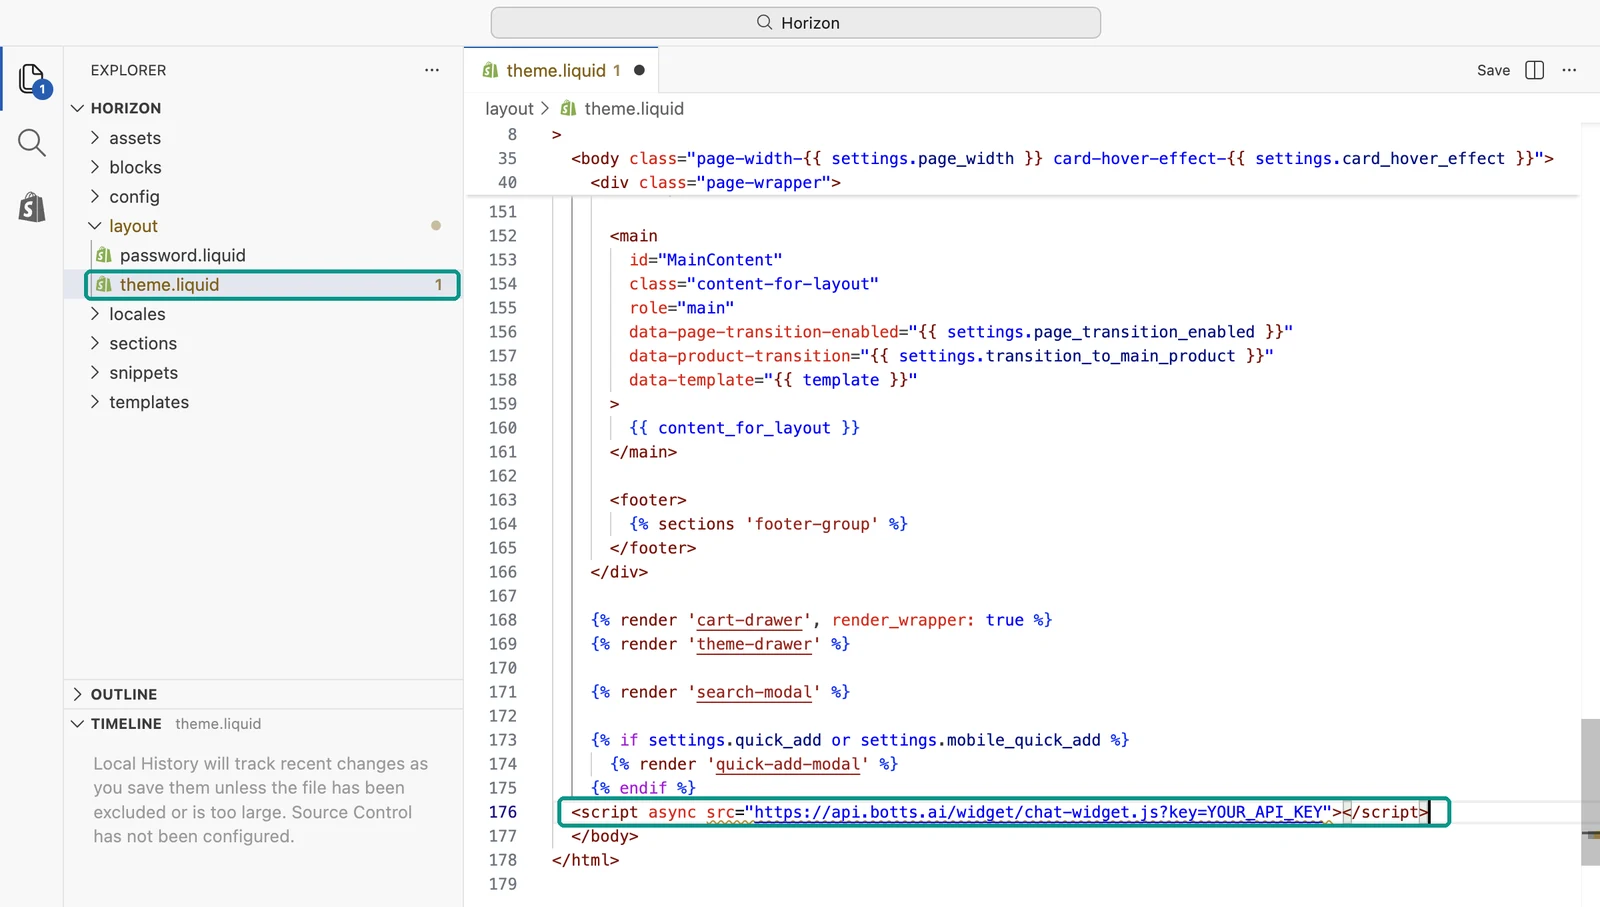
The editor may underline part of the line and show a warning that the asset should be served by the Shopify CDN. You can ignore it: the widget has to load from botts.ai, and the file saves normally.
Step 6: Save the file
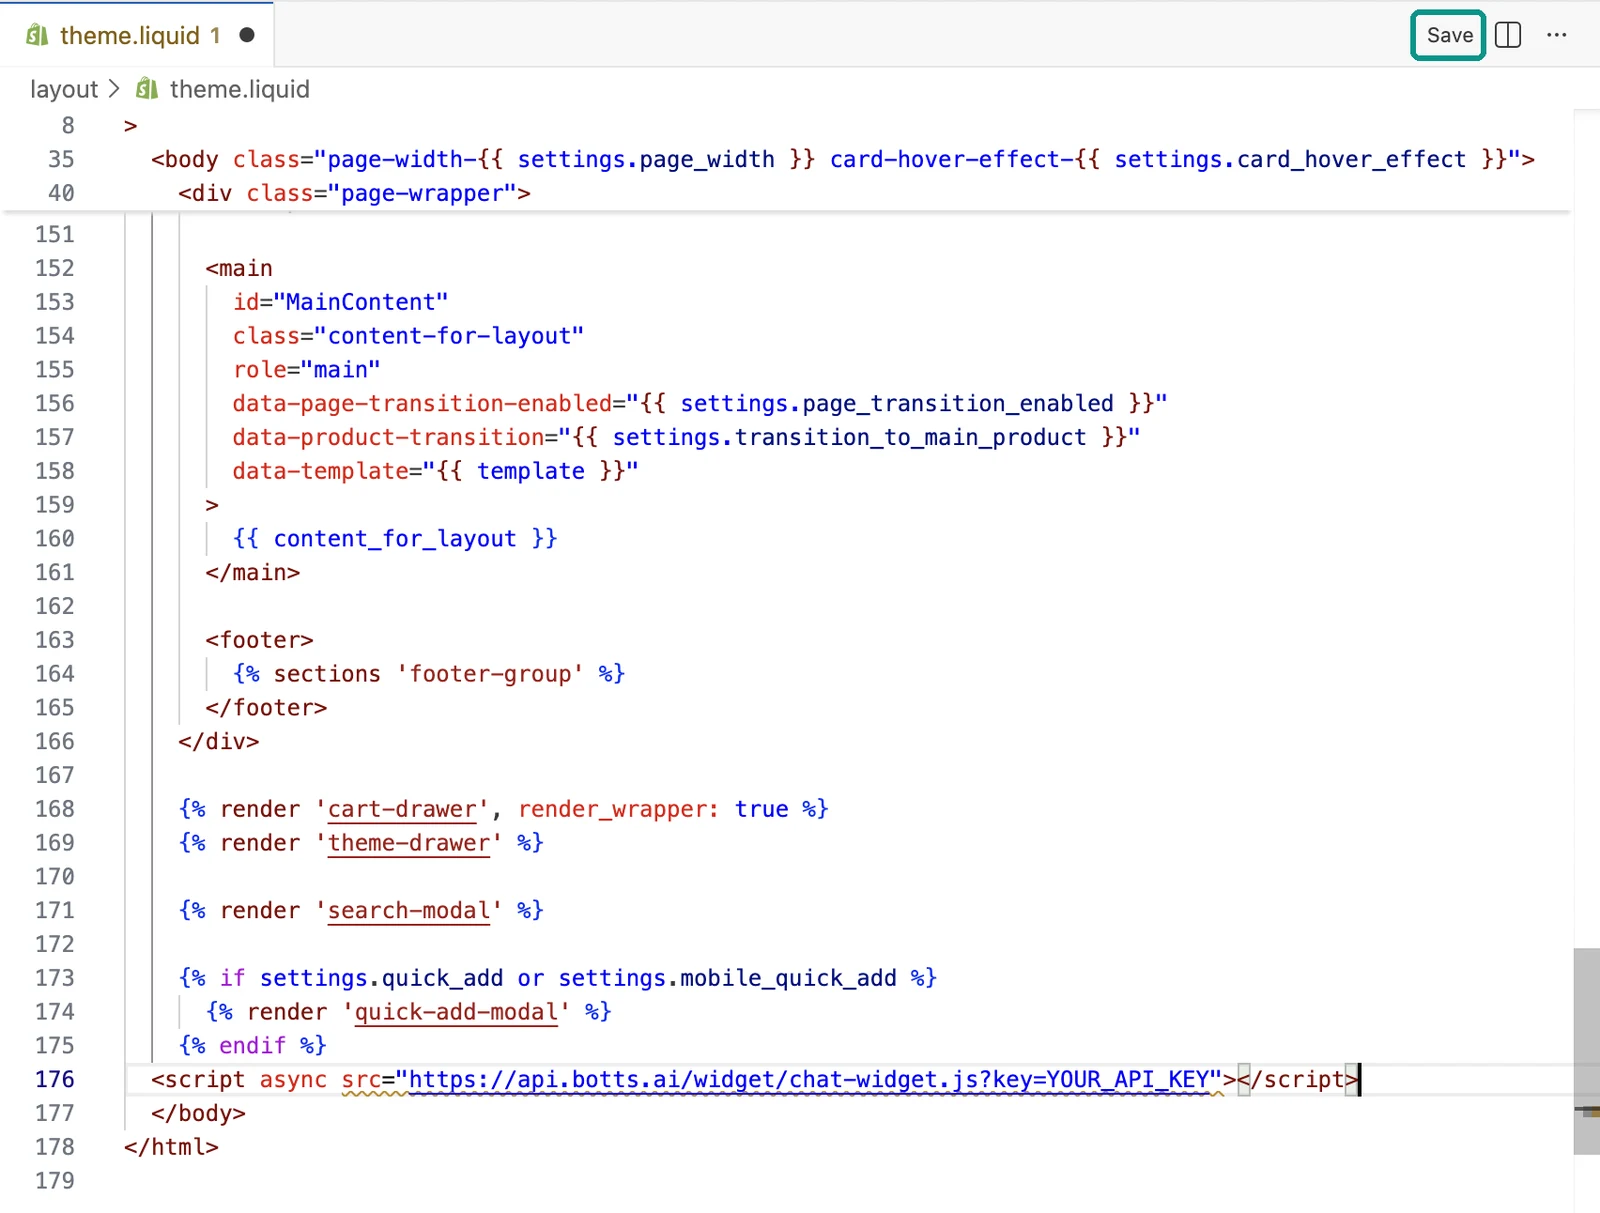
Click Save in the top right of the editor, or press ⌘ + S (Mac) or Ctrl + S (Windows). The code is now live on your published theme.
Step 7: Check the widget on your store
Open your store in a private window, reload the page and wait a moment. The chat launcher appears in the bottom-right corner, or wherever you placed it in the widget editor. Open it and send a test question. Check a product page and your phone as well.
If your store is still password protected, enter the store password first. The password page itself doesn't show the widget. Checkout pages don't use theme.liquid either, so the widget doesn't appear during checkout.
Tip
It worked if the widget shows on your store, opens, and answers your test question.
When you switch or update your theme
The code lives in the theme you pasted it into. If you publish a different theme, repeat steps 3 to 6 in that theme.
When a theme update is available, Shopify shows a notice in place of your theme's version number. If you click it and then Add to draft themes, the update appears in your drafts as a new theme named Updated copy of followed by your theme's name. Shopify tries to carry your code edits over and shows the result on the theme card:
- Theme added: code edits successfully included: the widget code came along. Check
theme.liquidin the new copy to be sure. - Theme added: code edits could not be included: repeat steps 3 to 6 in the updated copy before you publish it.
If the widget doesn't appear
- Check that you edited the published theme and not the backup copy or another draft.
- Check that the complete code is in
theme.liquid, just before</body>, and that you saved. The tab shows a dot while changes are unsaved. A number next to it only counts editor warnings. - If you recently published a new theme or an updated copy, check that its
theme.liquidcontains the code too. - Test in a private window without an ad blocker. If your cookie banner or consent app blocks scripts, check its configuration.
- Check that the key belongs to the right deployment and that the deployment is switched on in the Deploy tab.
Change or remove the widget
Colors, texts, the launcher and every other widget setting are changed in the botts.ai editor. Your store picks them up without any change in Shopify. The code only needs replacing if the deployment's key changes.
To remove the widget, open theme.liquid again, delete only the botts.ai script line and save.
Note
The screenshots show the Shopify admin in English. Menu and button names can differ with your admin language, and Shopify changes its interface from time to time.
More help
- Shopify Help Center: Editing theme code
- Shopify Help Center: Duplicating themes
- Shopify Help Center: Updating themes
- The general steps for any website: Embed code
Last updated on October 4, 2026